christmas

A Real Tree...Well, Kinda Real

Sunday, November 25, 2012

I was looking forward to putting up my Christmas tree up all week. I didn't want to do it before Thanksgiving, but I had every intention of putting it up after work on Saturday. I love our Christmas tree! You can check out last year's post about it here. Anyway...I was especially excited about it this year, because I was finally going to get to put the tree stand to use! So, after work I got home and found that Dane had already gotten the tree out of the closet...and then I looked at base of the tree. 
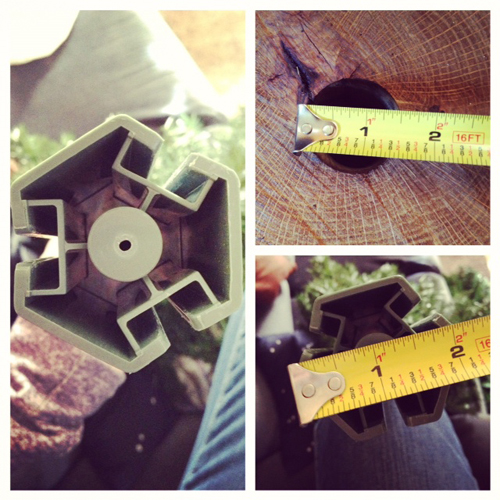

Talk about trying to fit a square hexagon in a round hole...I was momentarily devastated! The base was slightly more than a half an inch larger than the hole that my dad had cut. (Word of advice...measure your tree before you cut the log!) Luckily, the plastic, hexagon piece came off with some serious force. However, the bottom was then much smaller than the hole...but that was something I knew I could fix! 


I cut up some newspaper, rolled it up, and secured it with a rubberband. This took a while because I had to add more newspaper a couple of times and I had to adjust the hole in the center, but it eventually worked. 


There you have it...snug as a bug! It does wiggle a little, but it is not going to tip! I will probably find something more durable before we have little kiddos running around! 

For now I am thrilled with the final look! Not only does it look great, it also lifts the tree up so it is taller and presents actually fit under it! 


I wasn't sure I was going to get to put it up on Saturday at first...so glad I did! What do you think? I still have an extra stump if anyone is interested...and it already has a hole cut in it! 

christmas tree

Christmas Tree Project

Thursday, November 15, 2012

No, I have not put up our Christmas tree yet. I am waiting until after Thanksgiving to put it up, but I had some prepping to do. 

I love our little Christmas tree! Every year we decorate it with the same rustic ornaments (I added a couple new ones last year, but that was kind of a battle). This year I want to add another rustic touch. I have to thank my dad for this one...I wouldn't have been able to do it without him (he is always helping me with DIY projects...well, the ones the involve power tools). So, out to the woods we went. 


Dad cut a fallen tree into sections, and I picked one that I thought would work for my project. The piece that I picked was pretty large...so Dad had to cut it in half. We ended up hauling both pieces back to the house, because I wasn't sure which one I liked better. 


Once we got back from the woods we had another task to tackle. (Note: By we I really mean Dad...power tools were still needed for this step.) We had to drill a hole in the center of the stump. How big did we need to make the hole? That is a good question...a question that I still don't really know the answer to. I didn't actually get our Christmas tree down to measure it before we started this project...one because I knew it would be too tempting to put up if it was in my way somewhere else in the house, two because I needed Dane's help getting it down, and he wasn't home. However, there was a random Christmas tree in the shed that we used to determine the size of our hole...fingers crossed that our tree fits! 


Once I got home I started sealing the log. I used two coats of a pine stain and sealer. This step needs to be done in a well ventilated area outside! It is really smelly! I made sure to get the stain deep in all of the cracks of the bark. I really like the look of the darker stump. 


What do you think? I am not wishing away Thanksgiving, but I am excited to get my tree up. 

Oh, and I have an extra stump with the whole already drilled! If you are interested in having your own stump tree stand, let me know! 

christmas decorations

Oh Christmas Tree

Sunday, December 18, 2011

It is official...Christmas is just a week away! Most of you have probably already taken the time to put up a Christmas tree and all of your other Christmas decorations. (I started decorating 3 weeks ago!) This is the first year I was able to decorate the Christmas tree as a wife! I am sure you can imagine my excitement. Our small tree is the perfect size for the the corner of our living room, and luckily there is still room for all of the presents to fit around it. (Trust me...if the tree were any bigger presents wouldn't be an option!)


Decorating the Christmas tree is something I enjoy doing every year. When I was a child I would get to pick out a new ornament before Christmas, and as we decorated the tree each November we would look back at all of the ornaments that we collected.

Dane and I don't have an impressive collection of sentimental ornaments ro decorate our tree. I am sure that we will begin to collect those when we start having children, but this year I wanted my tree to have a theme: rustic!

Dane already had a great variety of rustic ornaments thanks to his wonderful mother!


We also had some shimmery, little red ornaments that added a needed pop of color!


Unfortunately, we did not have a tree topper, but that just meant that we could add our touch to the tree that was already great! We found this pretty silver star at Wal-Mart.


I also got a few simple, silver ornaments for the tree, and I used a couple of those to make these fun rustic ornaments!


Dane and I are so excited about spending this holiday season as husband and wife. We love our cute little tree and I am sure that it will evolve as we celebrate more Christmases, (I also need to find new stockings at some point...or make my own!) but for now we are very happy with our little tree and the special ornaments that decorate it!

{b}